Porch Beer

May 3, 2010

Summer weather has arrived in Chicago with sweltering temperatures and high humidity (for May, at least). The later parts of this week will mercifully drop back down to the 70's. Here's to hoping my office will be able to figure out a method of cooling the building that doesn't make the power go out ten times a day before the next heat wave. 

These are the nights when I love to sit on our porch, watching the neighborhood come alive, hoping for a breeze. A cool drink doesn't hurt either. Here is a recipe for one of my favorites. After an inconclusive internet search, I've decided to call this simple concoction Porch Beer. I've seen this drink labeled a Chelada, but in my experience that name most often refers to a beer and clam juice cocktail. I certainly wouldn't want to confuse the two. Please let me know in the comments if you happen to know a more appropriate name. 
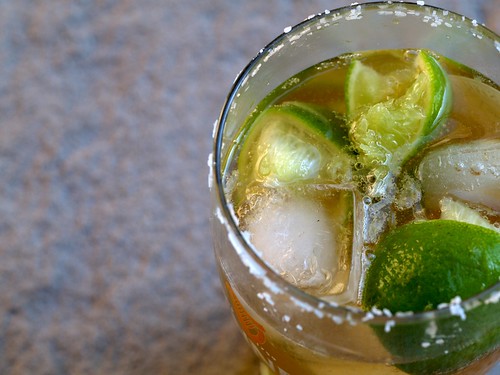
Porch Beer

Ingredients

12 oz. lager beer (I use Tecate)

1 lime

Kosher flake salt

4 large ice cubes

Method

Cut the lime into quarters and run one of the wedges around the rim of a 20 oz pint glass. Pour a tablespoon of salt into a flat dish and coat the glass rim.  Add four large ice cubes to the glass, squeeze in the lime juice, and add the lime quarters. Top with beer.

Candied Nuts

Candied Nuts (1)

Candied nuts are simple, delicious and almost endlessly variable. I used pecans and walnuts, but almonds and cashews also work quite well. I made a sweet and spicy variety using cinnamon and paprika, but you can use whatever spices you have on hand.  Some other flavors that work well are ginger, nutmeg, cloves, cayenne pepper, or even a dash or two of Worcestershire sauce. Once they cool, they will keep well in an air-tight container and make a lovely holiday gift.

Sweet & Spicy Candied Nuts

Ingredients

1/2 C brown sugar
1/2 C white sugar
1 1/2 tsp kosher salt
1/4 tsp hot smoked paprika
1 tsp ground cinnamon
16 oz pecan and walnut halves
1 egg white
1 Tbl water

Method

Preheat oven to 300F.  Line a baking sheet with parchment or a Silpat mat. In a medium bowl, combine the first five ingredients and mix until evenly distributed. In a second medium bowl, add the egg white and water and beat until slightly frothy. Add the nuts to the egg white and water mixture and toss until the nuts are evenly coated.  Add the sugar mixture and gently mix until evenly coated.  Spread the nuts on the prepared baking sheet and bake for about 30 minutes, stirring occasionally.  Remove from the oven and cool, breaking apart those that stick together. 

Peanut Butter and Black Sesame Cookies

Peanut Butter Sesame Cookies 1

These pretty little things are like a grown-up version of the typical peanut butter cookie.  The black sesame seeds are not only eye-catching, but they toast in the oven as the cookies bake, providing a nice balance to the sugar. Calling for just five ingredients and baking up in about ten minutes, these are a snap to make.

Peanut Butter Sesame Cookies 3

Peanut Butter and Black Sesame Cookies

Adapted from the March 2009 issue of Gourmet

Ingredients

1 C creamy peanut butter (the cheap kind, not natural)
3/4 C sugar
1 large egg
1 tsp baking soda
5 Tbl black sesame seeds

Method

Preheat the oven to 350F. Cream the peanut butter and sugar together in a medium bowl.  Add the egg and baking soda and mix until combined. Place the sesame seeds in a small dish and prepare a baking sheet lined with parchment paper or a Silpat mat.*

Use a teaspoon to measure the cookie batter and roll each portion into a ball using your hands.  Roll the cookie in the sesame seeds to coat the top and place on the baking sheet.  Continue this process with the rest of the dough.  Bake the cookies for ten minutes, rotating the pan halfway through. Bake until the cookies are puffed and cracked, about ten minutes.  Cool and serve.  These cookies will keep for a few days in an airtight container.

(* I managed to fit all of my cookies on one large baking sheet, but it was tight and a few of the cookie edges baked together. You may want to use two baking sheets or bake the cookies in shifts.)

Homemade Gifts

Homemade Gifts 1

Homemade gifts are a nice touch during the holidays.  Last year I started a bit early in the season and made vanilla extract, infused vodkas and peppermint patty candies. But homemade gifts don't need to be time consuming.  Two of my favorite quick projects are lemon and olive oil hand scrub and vanilla coffee syrup.  Not only are the ingredients inexpensive for these two projects, but many of you will likely already have them on hand.

I whipped up a batch of each in less than 20 minutes on Saturday and packaged them in decorative glass jars -- but old jam jars would would work just as well. I like to keep a few of these under the tree to pair with fresh baked cookies for a quick host or hostess gift during the holiday party season.

I'm always on the look-out for new gift ideas.  Feel free to leave other suggestions in the comments.

Savory Parmesan & Thyme Cookies

Parmesan&Thyme 1

Winter arrived in a serious way to Chicago this week. High winds and freezing sleet have created a winter landscape that is alternating between slush and ice, causing few to venture outside without reason. It is officially the season for soups, casseroles and cookies, winter boots, noisy radiators and hot chocolate. While I’m not one to pass up the sweet baked goods that are ubiquitous during this time of year, it’s often the savory ones that I crave. My Uncle Dave recently sent me this recipe for Parmesan and thyme cookies and they turned out to be the perfect weekend baking project. 

Parmesan & Thyme Cookies

Adapted from Ina Garten

Ingredients

1 stick butter, at room temperature
1 c freshly grated Parmesan cheese
1 tsp fresh thyme
1/2 tsp salt
1/2 tsp freshly ground black pepper
1 and 1/4 c flour

Method

In a medium bowl cream the butter, Parmesan, thyme, salt and pepper. Add the flour and mix until the dough has a coarse crumb. Turn out on a lightly floured surface and press the dough into a ball. Roll the dough into a 9" log, wrap in plastic wrap and refrigerate for 30 minutes (or up to 4 days).

Preheat the oven to 350F. Cut 3/8" slices from the log of dough and place on a cookie sheet lined with parchment or a Silpat mat. Bake for 20 minutes or until just slightly golden brown.

Additional notes:

If you don't have fresh thyme on hand, dry works almost as well. This dough is a bit tricky to roll out because it is slightly dry.  Be sure to continuously compress the dough to keep it solid as you work.  Once, chilled, the dough is very easy to work with.   

Chile Glazed Sweet Potatoes with Cinnamon and Orange

4142856230_cd1c3cf8f2_b

Nick has perfected many recipes in our Rick Bayless cookbook collection, but this is one of my favorites. Not only do the bright flavors complement the sweet potatoes, but the dish makes a richly colored addition to the dinner table.  For those of you who may not be familiar with Rick Bayless, I highly recommend his cookbooks to anyone interested in learning more about preparing Mexican cuisine. (As well as a visit to any of his Chicago restaurants.)

Chile Glazed Sweet Potatoes with Cinnamon and Orange

Adapted from Rick Bayless

Ingredients

5 garlic cloves, unpeeled
6 medium dried ancho chiles, stemmed and seeded
1 tsp dried Mexican oregano
1/2 tsp cinnamon
1/4 tsp black pepper
1/8 tsp ground cloves
1/2 C chicken or vegetable broth
3 lbs sweet potatoes, unpeeled
1 Tbl orange zest
1/2 C fresh orange juice
2 Tbl honey
1 tsp salt
butter for baking dish

Method

To make the seasoning paste, roast the unpeeled garlic in a pan over medium heat until soft and blackening in spots, about 15 minutes.  Cool and peel. While garlic is roasting, use the same pan to roast the chiles one or two at a time. Open them flat and press them into the pan with a spatula, letting the chiles crackle. Toast both sides. Transfer chiles to a small bowl and cover with hot water.  Allow to rehydrate for 30 minutes, stirring occasionally.

Combine the oregano, cinnamon, black pepper and cloves, drained chiles, roasted garlic and broth in a food processor until a smooth paste forms, scraping down the sides as you work. Pass the mixture through a mesh strainer into a bowl. Stir in the orange zest, orange juice, honey and salt.

Preheat oven to 350F. Slice each of the sweet potatoes into four wedges, lengthwise. Butter a 13 x 9 inch baking dish and arrange the potatoes in a single layer. Spoon the sauce evenly over the potatoes. Cover the dish with aluminum foil and bake for 45 minutes or until almost tender.

Raise the temperature to 425F, uncover the potatoes and baste with sauce.  Bake until the sauce has thickened into a glaze, about 10 minutes. Serve warm.

Molasses Pumpkin Pie

Pie

From the archives.

I don't know about you, but my Thanksgivings don't feel quite complete until I am sinking my teeth into a slice of pumpkin pie.  There are dozens of recipes out there, but this is my favorite.  The molasses gives depth to the creamy, delicately spiced filling, making this a subtle riff on the classic version. 

Pumpkin Pie

Ingredients

1 pie crust, rolled out and chilled in a pie dish
2/3 C brown sugar
1/2 C white sugar
2 Tbl flour
1/2 tsp cinnamon
1/8 tsp each of: allspice, cloves and ginger
1/2 tsp salt
1 1/2 C canned pumpkin
2 Tbl molasses
1 tsp vanilla
3 large eggs
1 C whipping cream

Method

Place a baking sheet in the oven and preheat to 450F.  Combine sugars, flour, spices and salt in a large bowl.  Add the pumpkin, molasses, vanilla and eggs and incorporate the cream last.

Pour batter into chilled pie crust and bake for ten minutes.

Reduce oven heat to 325F and bake for another 40 to 45 minutes.  The middle should be set and the sides of the pie should puff up a bit.

Allow pie to cool and serve at room temperature or chilled. 

I usually whip any excess cream with a touch of vanilla to serve along with each slice.   This pie can be made up to a day ahead, making it easy for large holiday dinners.

Popovers

Popovers 3

Popovers are one of my favorite additions to a weekend breakfast.  These airy, eggy breads look impressive, but are fairly easy to prepare.  The one caveat is that, in my experience, investing in a real popover pan like the one pictured makes a huge difference. In an effort to avoid a single-use piece of equipment, my first popover attempts used muffin tins and yielded disappointing results. (I now use this popover pan from Chicago Metallic.)

Popovers 1 Popovers 2

Popovers

Makes six popovers

Ingredients

1 3/4 C half-and-half, warmed*
2 C flour**
3/4 tsp salt
1/2 tsp baking powder
3 eggs, at room temperature
2 Tbl butter, melted
1 Tbl Dijon mustard

Method

Heat the half-and-half in a saucepan over medium heat until just warm. In a large bowl, combine flour, salt and baking powder. In a second bowl, combine the eggs, milk, butter and mustard - beat well to combine.  Add the flour mixture to the egg mixture and stir until just combined. Let batter rest at room temperature for at least 30 minutes and up to 60 minutes.

Preheat oven to 450F with a rack in the middle of the oven. Heat the empty popover pan for 5 minutes.  Carefully remove from the oven and, working quickly, spray the pan with a nonstick cooking spray and fill the cups almost to the top with batter.

Bake for 15 minutes without opening the oven door. Reduce heat to 375F and bake for another 20 to 25 minutes, or until a rich golden brown. Remove popovers from oven and pierce the sides with a sharp knife to let steam escape (to ensure they won't collapse). Serve immediately with butter.

(*You can substitute whole milk. **I've used both all-purpose and bread flour (high-gluten) with good results.)

Popovers

Popovers 3

Popovers are one of my favorite additions to a weekend breakfast.  These airy, eggy breads look impressive, but are fairly easy to prepare.  The one caveat is that, in my experience, investing in a real popover pan like the one pictured makes a huge difference. In an effort to avoid a single-use piece of equipment, my first popover attempts used muffin tins and yielded disappointing results. (I now use this popover pan from Chicago Metallic.)

Popovers 1 Popovers 2

Popovers

Makes six popovers

Ingredients

1 3/4 C half-and-half, warmed*
2 C flour**
3/4 tsp salt
1/2 tsp baking powder
3 eggs, at room temperature
2 Tbl butter, melted
1 Tbl Dijon mustard

Method

Heat the half-and-half in a saucepan over medium heat until just warm. In a large bowl, combine flour, salt and baking powder. In a second bowl, combine the eggs, milk, butter and mustard - beat well to combine.  Add the flour mixture to the egg mixture and stir until just combined. Let batter rest at room temperature for at least 30 minutes and up to 60 minutes.

Preheat oven to 450F with a rack in the middle of the oven. Heat the empty popover pan for 5 minutes.  Carefully remove from the oven and, working quickly, spray the pan with a nonstick cooking spray and fill the cups almost to the top with batter.

Bake for 15 minutes without opening the oven door. Reduce heat to 375F and bake for another 20 to 25 minutes, or until a rich golden brown. Remove popovers from oven and pierce the sides with a sharp knife to let steam escape (to ensure they won't collapse). Serve immediately with butter.

(*You can substitute whole milk. **I've used both all-purpose and bread flour (high-gluten) with good results.)

Alfajores

AlfajoresWhen Nick and I visited Buenos Aires this past summer, we fell in love with alfajores - dulce de leche cookies. On our last day, we picked up a giant jar of dulce de leche in the San Telmo neighborhood so that we could try making our own back in Chicago.  Nick beat me to it on a recent day off, and the results were amazing. These are without a doubt the best cookies I have ever eaten.

3782446228_5ab85a5b76_o 3587526155_4ffc824504_o

Buenos Aires was a beautiful city that I hope to have the opportunity to visit again.  We ate delicious food, walked through charming neighborhoods and spent time with our awesome friends Peter, Pao and Arturo. I recently wrote a short article for Gapers Block about drinking in Argentina that I encourage you to read if you want to learn more about our trip (though I hope to post more on this site soon).

Nick's Alfajores

Ingredients

1 3/4 C flour 1/8 tsp salt 1/2 C sugar 1 tsp baking soda 8 Tbl butter, at room temperature 4 egg yolks, lightly beaten 1 tsp vanilla 1 Tbl milk 15 oz dulce de leche*

Method

Combine flour, salt, sugar and baking soda in a bowl.  Mix in the butter and then work in the egg yolks, milk and vanilla. Shape the dough into two separate balls, wrap in plastic wrap and chill for about two hours.

Preheat oven to 325F. Roll out each ball of dough on a slightly floured surface to a 1/4 inch thick. Cut using a two-inch cookie cutter and transfer cookies to baking sheets covered with silpat mats. Bake for about 15 minutes, until the tops of the cookies appear dry, but not so long that the cookies brown.

Allow the cookies to cool on a wire rack.  When cool, spread half the cookies with dulce de leche and top with the other half.  Serve with a café con leche for an irresistible treat.

A traditional way to serve the cookies is to roll the sides in shredded coconut.  We're not big coconut fans, so we left ours plain.

*We used dulce de leche that we brought back from Argentina.  Feel free to use store bought or make your own.  There are plenty of traditional recipes out there, but I was extremely intrigued to find this recipe from the lovely blog Not Without Salt that calls for simply cooking a can of condensed milk in boiling water.  Brilliant.

Candy Pumpkins

Candy (1 of 6)

I recently joined fellow Gapers Block food writers at Ras Dashen for a delicious dinner of Ethiopian food. One of the new contributors, Shanna Quinn, mentioned that after reading recipes for homemade candy corn, she experimented with a few to create candy pumpkins. She posted the recipe a few days later and I promptly marked it to try myself.

Candy (3 of 6) Candy (5 of 6) 

Candy making is not my strong point in the kitchen, but I followed Shanna's recipe exactly and it worked out very well. While the final product is a bit softer, the flavor is remarkably true to store-bought. I wound up with quite a bit of extra green dough after dividing it in the quantities the recipe calls for.  This gave me the opportunity to make some green pumpkins and candy snakes. Though, if you want all of your candy to look more traditional, I'd recommend making slightly less green dough.

Maine

Realmussels

Near the end of August I traveled to Trenton, Maine to join my friends Molly and Stefan on their wedding day. We all met in Portland, Oregon where we attended Reed College. The long weekend was filled with many familiar faces from those days.  Old friends traveled from all corners of the country and the globe to join the celebration, and it was truly one of the most beautiful I have attended.

Backyard Backyard2

Molly grew up in Trenton and the wedding took place in her father's backyard which is quite a sight, especially when the tide rolls out in the evening.

Boat2

It was my first time visiting Maine.  The trip was brief, just two nights, but my traveling companions and I made the most of it.  We took a surreal, fog-filled cruise on the Margaret Todd and enjoyed some Bar Harbor night-life.

Water

We went for a short hike and took in the incredible air from the shore. (Next time I will plan a trip long enough to really enjoy Acadia National Park).

Lobsterpiece

And of course, we ate a lot of fresh seafood.

Cooler Lobsterarm

Many of us stayed just down the street from the Trenton Bridge Lobster Pound and it became a quick favorite that we visited multiple times. 

Chowder

This family-owned, no frills establishment serves fresh boiled lobster, steamed clams, steamed corn, chowders, stews and pies and I think we wound up sampling just about everything.

Lobster1

Unsurprisingly, the wedding dinner was also incredible.  Late summer salads, plenty of locally brewed beer, and a lobster bake on-site. Enjoying this amazing meal under a light-filled tent on the shore with so many of my favorite people is a memory I will not soon forget.

Molly Dan

Congratulations Molly and Stefan!

(For more Maine photographs, visit my Flickr album.)

Apple, Honey and Thyme Turnovers

HoneyThyme 7

Last summer my friends Andy and Sarah were married in rural Illinois and they gave each guest a jar of delicious locally produced honey as a wedding favor.  I tend to use honey primarily as a condiment and after a full year I had barely made a dent in the jar.  A recent dinner at Province hosted by the National Honey Board inspired me to use it in a sweeter dish, tempered with savory herbs.  The flavors in these turnovers work beautifully together.  If you are curious about the flavor combination but don't want to bake, prepare the filling and serve it warm with vanilla bean ice cream.

HoneyThyme 14 HoneyThyme 8

Apple, Honey & Thyme Turnovers

Loosely adapted from The New York Times

Ingredients

2 Granny Smith apples
1/4 C honey
6 thyme branches
2 Tbl butter
1/2 tsp ground ginger
1/4 tsp salt
1 sheet butter puff pastry, thawed
Flour for dusting
1 egg
1 Tsp milk

Method

Preheat oven to 400F

Core and cut each apple into eight slices.  In a large skillet, heat the honey over medium-high heat until simmering.  Add the apple slices, thyme and butter and cook for 10 to 15 minutes, turning until well caramelized on all sides and just getting soft.  Remove the thyme and add the ginger and salt, turn off the heat, and stir to thoroughly combined.

Divide the puff pastry into sixths and gently roll out each piece on a lightly floured surface into five inch squares.  Divide the filling evenly between the six squares, leaving a one-inch border. Beat the egg and milk together and brush the edges of each pastry.  Fold each pastry in half to form a triangle and press the edges with fork tines to seal.  Brush each pastry with the remainder of the egg wash and gently pierce the tops with a sharp knife.  Bake for 20 minutes or until golden brown. Allow to cool slightly before serving.

Tomato and Corn Pie

Pie

When the recent issue of Gourmet arrived in my mailbox, I was quite taken with their retro-inspired tomato and corn pie recipe.  This dish truly embodies the bounty of a midwestern summer. Seasonal ingredients topped with sharp Cheddar cheese, fresh herbs and a dollop of mayonnaise make this meal well worth the trouble of baking in August.

I followed the recipe exactly, so I won't post it here, but I suspect that substituting modified quantities of dried herbs would work just fine if you don't have any fresh available. The biscuit crust is quite forgiving, so this recipe is worth a try even if you have lousy luck with other pie crusts. After baking, the bottom crust came out a big soggy, so I would recommend removing some of the juice from your tomatoes before assembling. Serve with a small green salad and a cool glass of vinho verde for a great end-of-summer supper.

Pie3

Things have been so busy here!  We are finally moving this weekend and I am looking forward to getting my computer back in order, catching up with my photos from Buenos Aires, introducing you to a remarkable bakery in rural Montana, telling you all about my recent Maine lobster binge in Bar Harbor, and sharing details about the excellent dinner I attended last night at Province hosted by the National Honey Board.  It has been a truly memorable summer.

White Bean Dip and Baked Pita Chips

Dip5

In the winter, one of my favorite dishes to make involves cannellinibeans fried in a bit of butter with salt and pepper.  It's about as basic as you can get, but I love the unadulterated flavors of this creamy bean.  As we prepare for our move, I've continued to try to find ways to use up some of the items on our kitchen shelves. At some point during our long Chicago winter, I apparently stocked up on cans of cannellini beans, so I decided to find a summery way to use them. While a bit more involved than my winter menu, this meal is still simple and quick to prepare.

White Bean Dip

Ingredients

1 can (15 oz) of cannellini beans, rinsed
2 garlic cloves, roughly chopped
Juice of 1 lemon
¼ C olive oil
2 Tbl pesto
salt and pepper to taste

Method

Combine all of the ingredients in a food processor and puree until smooth. Add a bit more oil or some water if the dip is too thick.  Salt and pepper to taste.  Serve with fresh vegetables and oven-baked pita chips (see recipe below).

Oven-Baked Pita Chips

Makes 48 chips
Preheat oven to 400F

Ingredients

3 store-bought pocket pitas (wheat or white)
2 Tbl olive oil
2 Tbl grated Parmesan
1 Tbl Herbes de Provence (or other dried herbs)
Kosher flake salt
Pepper

Method

Cut the pitas into 8 wedges.  Separate each wedge at the seam into two pieces. Place in one layer on a large sheet pan.  Brush or drizzle with olive oil (don't worry about covering the surfaces, this is mainly for flavor) and sprinkle with the Herbes de Provence, salt and pepper.

Bake chips for about five minutes and then sprinkle on the Parmesan.  Bake for about five more minutes, or until crisp and golden.

Maple and Dried Cranberry Granola

Granola2

We are moving at the end of this month into the main floorof a beautiful old graystone mansion on one of Chicago’s tree-lined boulevards. It’s the kind of place that I would often enviously eye as I walked to my uninspiring, white-walled home - wishing for a bit of that old hardwood and sunshine. Four of us will be sharing the enormous space and saving on rent in the process.

As we begin to plan our move and start another cycle of security deposits, I have a renewed interest in finding inspiration in my stockpile of dry goods. While I didn’t have the proper combination of dried fruits and nuts on hand, Melissa Clark's recent olive oil granola inspired me to throw together my own version. I still stand by the Harrison House granola as my favorite, but I thought I would share this perfectly delicious, less expensive recipe with you. The lovely thing about granola is that you can add almost any type of nuts and dried fruits to the basic recipe.  Feel free to modify.

Maple and Dried Cranberry Granola

Ingredients

3 C old-fashioned rolled oats
1 C roasted sunflower seeds, hulled and salted
¼ C ground flax seed*
¾ C maple syrup
½ C extra virgin olive oil
½ C packed brown sugar
1 tsp kosher salt
½ tsp ground cinnamon
½ tsp ground cardamom
¾ C dried cranberries

Method

Preheat oven to 300F. Mix all ingredients in a large bowl, except the dried cranberries. Pour mixture onto a heavy baking sheet in an even layer and bake for 45 minutes, stirring every 10 minutes. Stir just enough to ensure the granola won’t burn, but not so much that all the delicious clumps of granola break apart (this is a matter of preference, of course).

When well-toasted and fragrant, remove from the oven and allow to cool. Mix in the dried cranberries and store in an air-tight container.

(*If you don't have ground flax seed stashed in your freezer like I do, omitting this ingredient will not dramatically change the final product.)

Apples and Roosters

Crepe

Ever since my parents brought home an Apple IIc Plus in the late 80's, we've been serious fans of the company.  My brother even works for them now. So when the hard drive on my 2007 MacBook failed Monday night as I was uploading photos, it was comforting to know that, because I had recently backed up my data and the hardware was still under warranty, it would be a quick process to get it up and running again.  After a thirty minute Genius bar appointment at the Michigan Avenue store, I left with a new hard drive and an updated operating system.
It will take me a few more days to transfer all of my photos back to the computer and pick up editing were I left off, but I wanted to put up a quick post to remind all of you to back-up your data when you get home from work this evening.  I am so glad I recently did.
The lovely crepe you see in the photo is from the Rooster Cafe in St. Louis, Missouri.  My friends Matt and Diana were married in St. Louis this summer and while we were there we dined at this excellent restaurant every morning.  If you are ever in the city searching for brunch, I would highly suggest this establishment.

Buttermilk Dill Dressing

Dressing

There are few things better than a salad dressed in homemade, creamy dressing to cool off a summer afternoon. The earthy flavors of dill combined with the subtle tartness buttermilk in this recipe make it the only dairy-based dressing I make with any frequency.

This recipe was inspired by a restaurant here in Chicago called Swim Cafe. They used to serve a salad of spinach, mushrooms, brie and dill topped with a buttermilk dressing.  They still offer something similar, but it was this former version that used to make me venture miles out of my way to enjoy as a summer lunch.

Buttermilk Dill Dressing

Ingredients

1/2 C buttermilk, shaken
1/3 C mayonnaise
3 Tbl fresh dill, chopped
1 Tbl shallot, minced
salt
pepper

Method

Whisk together the buttermilk and the mayonnaise.  Stir in the dill and shallot and season with salt and pepper to taste. Cover and refrigerate any unused portion.

Buttermilk Dill Dressing

Dressing

There are few things better than a salad dressed in homemade, creamy dressing to cool off a summer afternoon. The earthy flavors of dill combined with the subtle tartness buttermilk in this recipe make it the only dairy-based dressing I make with any frequency.

This recipe was inspired by a restaurant here in Chicago called Swim Cafe. They used to serve a salad of spinach, mushrooms, brie and dill topped with a buttermilk dressing.  They still offer something similar, but it was this former version that used to make me venture miles out of my way to enjoy as a summer lunch.

Buttermilk Dill Dressing

Ingredients

1/2 C buttermilk, shaken
1/3 C mayonnaise
3 Tbl fresh dill, chopped
1 Tbl shallot, minced
salt
pepper

Method

Whisk together the buttermilk and the mayonnaise.  Stir in the dill and shallot and season with salt and pepper to taste. Cover and refrigerate any unused portion.

Lemon and Herb Potato Salad

Potato2 copy
Picnic salads were a staple at summer events growing up in a small Midwestern town. All manner of egg salads, potato salads and pasta salads could be found at any reasonably sized gathering.  I'm not sure if it was the mayonnaise, questionable refrigeration methods, or the prevalence of raw onions -- but I usually made a point to avoid these offerings in my younger years.

As my palate has grown, so has my desire to revisit these classic dishes and make them worthy of their place at our family table. Thanks to my father's bountiful herb garden, I was inspired to try this flavorful twist on potato salad at our recent Independence Day celebration. This recipe could be easily adapted to the assortment of fresh herbs in your garden.

Lemon and Herb Potato Salad
adapted from Bon Appétit

Ingredients
3 pounds baby red potatoes
3 Tbl unseasoned rice vinegar
3/4 C mayonnaise
4 medium chives, thinly sliced
1 Tbl fresh oregano
1 Tbl fresh thyme
2 Tbl fresh basil leaves, chopped
1 1/2 tsp lemon zest
salt and pepper

Method
Rinse the potatoes and pierce them once with a fork. Bring them to a boil in a large pot of salted water.  Reduce heat to medium-low and simmer the potatoes until tender, about 17 minutes. Drain and let stand until cool enough work with.

Cut the potatoes into 1/4 inch pieces.  Place into a large boil and toss with the vinegar and some salt and pepper. Add the rest of the ingredients and toss to combine. Salt and pepper to taste. Refrigerate until you are ready to serve.